
How to Safely Remove a Paintball Tank Under Pressure
The Complete Expert Procedure — From Dry-Fire Depressurization to On/Off ASA Protocol, Emergency Bleeds, and Protecting Your O-Ring Every Single Time
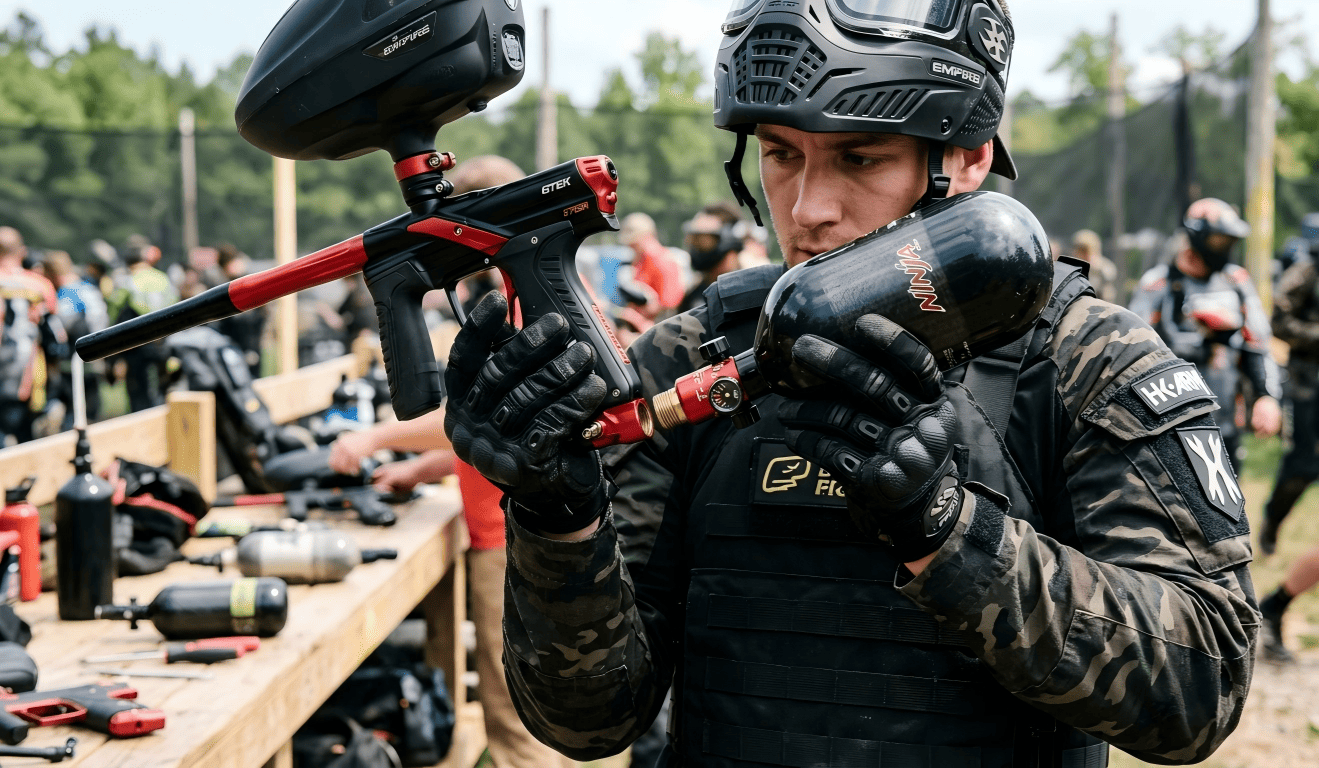
You’ve finished your game, your tank is still showing 2,000 PSI on the gauge, and you need to get it off the marker. Do you just unscrew it? Most players do — and most players are quietly destroying their O-rings, risking thread damage, and in some scenarios, exposing themselves to a genuine pressure hazard every single time.
Removing a paintball tank under pressure incorrectly is the leading cause of tank O-ring blowouts, ASA thread damage, and unexplained leaks that appear “out of nowhere” after a game. The good news: the correct procedure takes under 30 seconds and requires zero tools. Once you understand why each step exists — what’s happening inside the tank valve and ASA at a physics level — you’ll never skip it again.
This guide covers the complete safe removal procedure for both HPA and CO2 paintball tanks, the On/Off ASA method, how to handle a marker that won’t dry-fire, emergency pressure bleed techniques, and the most common mistakes that silently damage your equipment over time.
📋 Table of Contents
- What Actually Happens Inside Your Tank During Removal
- Method 1: The Standard Dry-Fire Depressurization (No On/Off ASA)
- Method 2: The On/Off ASA Procedure (Fastest & Safest)
- Method 3: Emergency Removal When the Marker Won’t Fire
- Special Considerations for CO2 Tank Removal
- The 6 Most Damaging Removal Mistakes (And Exactly What They Break)
- What to Do Immediately After Removing the Tank
- Field Owner Section: Safe Tank Rotation for Rental Fleets
- FAQ
1. What Actually Happens Inside Your Tank During Removal
Understanding the internal mechanics makes every step of the removal procedure obvious — not arbitrary. Here’s what’s happening inside your marker when the tank is connected and pressurized:
⚙️ Pressure System Anatomy: Paintball Marker + HPA Tank
This is also why a brief, short hiss is acceptable during removal but a sustained hiss is not. The brief hiss is the final ~50–100 PSI bleed from the narrow ASA passage between the tank valve and the first thread gap — a trivially small volume. A sustained hiss means Zone C and D are still at full regulated pressure, and your O-ring is about to experience the full force calculated above.
2. Method 1 — The Standard Dry-Fire Depressurization
This is the universal technique that works on every paintball marker, regardless of whether you have an On/Off ASA. It takes under 30 seconds. There is no reason to skip it — ever.
- Point the marker in a safe direction. Treat it as you would a loaded firearm. Choose a direction with no people, no fragile objects, and ideally a soft surface (a field backstop net, the ground, a bag). You will be expelling compressed air — not paint — but the burst can be startling to bystanders.
- Remove your finger from inside the trigger guard until you’re ready. Confirm your safety is OFF (you need to fire), then hold the marker with your non-dominant hand away from the muzzle.
- Pull the trigger 3–5 times in quick succession. Each pull vents the air in the marker’s firing chamber (Zone D) through the barrel. You’ll hear a series of short “pfft” sounds getting progressively quieter. By shots 4–5, there should be little to no air discharge — indicating Zone D is nearly empty.
- Confirm pressure is cleared: pull the trigger one more time. If you hear nothing — or only a very faint click of the solenoid — the marker body is depressurized. If you still hear air discharging, fire 3 more times and repeat the check.
- Begin unscrewing the tank — slowly. Turn counter-clockwise. You may hear a very brief hiss (1–2 seconds) as the final small volume in the ASA passage bleeds through the widening thread gap. This is normal. If the hiss is sustained (5+ seconds), stop — re-tighten fully and dry-fire 5 more times before trying again.
- Continue unscrewing smoothly until the tank is free. No sudden yanking. A slow, controlled unthread motion protects the O-ring and the ASA threads equally.
- Install the tank dust cap immediately. The exposed O-ring on the tank neck is vulnerable to UV, grit, and physical nicks the moment the tank is off the marker. Cap it within 30 seconds of removal.
3. Method 2 — The On/Off ASA Procedure (Fastest & Safest)
If your marker is equipped with an On/Off ASA (Air Source Adapter), you have access to the cleanest, most reliable tank removal method available. An On/Off ASA adds a valve that physically blocks air flow between the tank and the marker body — allowing you to depressurize the marker without firing, and to install or remove the tank at zero system pressure.
- Switch the On/Off ASA lever/knob to the OFF position. This closes the valve between the tank output and the marker body. The tank itself remains fully pressurized — you are only isolating the marker body (Zone C and Zone D) from the tank supply.
- Dry-fire 3–5 times to vent Zone C and Zone D pressure. Even with an On/Off ASA, the marker body between the valve and the barrel still holds regulated pressure. These dry-fires clear that volume. You’ll hear the pressure discharge reduce to silence within 3–4 shots.
- Confirm: one more trigger pull should produce silence. The On/Off ASA has blocked new air from the tank; the dry-fires have cleared the body. The system is now at atmospheric pressure between the On/Off valve and the muzzle.
- Unscrew the tank. Because the On/Off valve is closed, unscrewing the tank breaks the connection between the tank’s output port and the ASA inlet — but Zone C is at atmospheric pressure. You should hear no hiss whatsoever. A completely silent removal is the hallmark of the correct On/Off ASA technique.
- Install the dust cap on the tank neck immediately.
4. Method 3 — Emergency Removal When the Marker Won’t Fire
Occasionally your marker malfunctions, the solenoid seizes, or the trigger mechanism jams — and you can’t dry-fire to clear pressure. This is the emergency scenario that requires a more deliberate approach. Do not panic. Follow these steps calmly and in order.
- Check your On/Off ASA first (if equipped). Switch it to OFF immediately. This stops new air from the tank entering the body and limits the pressure volume you need to manage to Zone C and Zone D only.
- Look for a velocity adjuster or inline regulator bleed screw. Many markers (Planet Eclipse, Empire, Dye, Tippmann) have a small flathead screw on the regulator body or grip frame that, when turned counter-clockwise 2–3 turns, opens a bleed port releasing body pressure. Consult your marker’s manual for this feature — it’s the cleanest non-firing depressurization method available on compatible markers.
- If no bleed screw: use the controlled slow-release method. Point the marker in a safe direction. Begin unscrewing the tank very slowly — one eighth of a turn at a time. Between each partial turn, pause 3–5 seconds. The air will bleed gradually through the widening thread gap. This is slower but controls the pressure release rate, preventing the sudden force spike that ejects O-rings.
- ⚠️ Never remove the barrel during a pressurized jam. Removing the barrel from a pressurized marker with a jammed solenoid can result in the bolt being expelled by residual air pressure. Keep the barrel on until the system is confirmed depressurized.
- Once pressure has bled and the marker body is quiet: complete the tank removal normally. Inspect the O-ring carefully after any emergency removal — the slow-bleed method is gentler than a sudden release, but extended contact with partially-pressurized threads still creates more O-ring wear than normal dry-fire removal.
5. Special Considerations for CO2 Tank Removal
CO2 paintball tanks behave fundamentally differently from HPA systems during removal, and require additional precautions — particularly in warm weather conditions. Understanding these differences is essential for any player or field owner managing CO2 equipment.
💨 HPA Tank Removal Characteristics
- Pressure in the marker body is predictable and consistent
- Dry-fire method reliably clears all body pressure in 3–5 shots
- No temperature-related pressure spikes during removal
- Hiss during removal is brief, predictable, and controlled
- Safe to remove at any ambient temperature
- Regulated output doesn’t change with temperature
❄️ CO2 Tank Removal — Additional Risks
- CO2 pressure is temperature-dependent: above 35°C (95°F), can spike to 1,200+ PSI
- Liquid CO2 can enter the marker body in certain orientations, causing sudden pressure surges when the tank is shifted during removal
- Dry-fire method still works — but may require more shots (up to 10) to fully clear liquid CO2 that has entered the marker
- CO2 expansion during rapid removal causes a freezing effect at the connection point — frosted threads are a sign of unsafe too-rapid removal
- Never store CO2 tanks in car trunks or hot environments before use
🌡️ CO2 Vapor Pressure vs Temperature (Antoine Equation Approximation)
6. The 6 Most Damaging Removal Mistakes — And Exactly What They Break
💸 Removal Mistakes: What Gets Damaged and What It Costs to Fix
| Mistake | Component Damaged | How It Fails | Repair Cost |
|---|---|---|---|
| Removing tank without dry-firing first | Tank neck O-ring | Pressure differential ejects or extrudes O-ring from groove | $3–$8 (O-ring kit) |
| Fast, yanking unscrew motion | ASA threads + tank neck threads | Cross-threading under pressure; stripped aluminum threads | $25–$65 (ASA replacement) |
| Holding marker muzzle-down during CO2 removal | ASA valve + O-ring + regulator inlet | Liquid CO2 pooling at connection; freeze-burst on separation | $15–$40 (ASA + O-ring) |
| Not installing dust cap after removal | Tank neck O-ring | UV degradation, grit contamination, physical nicks over weeks/months | $3–$8 (O-ring kit) — cumulative replacement cost |
| Using tools (pliers, strap wrench) to “help” unscrew | Tank body + ASA body | Over-torque causes ASA housing crack; tank neck deformation | $25–$150 (ASA or tank replacement) |
| Removing tank from a hot CO2 marker immediately after heavy use | CO2 tank valve + regulator seat | Elevated temperature = higher CO2 pressure; removal under spike pressure damages poppet seat | $15–$40 (regulator rebuild) |
Right Way vs. Wrong Way: Side-by-Side
❌ What Most Players Do
- Finish game, grip the tank, and unscrew immediately
- Hear a long hiss and keep going anyway
- Toss tank in gear bag without dust cap
- Next session: wonder why there’s a leak
- Buy a new O-ring, but repeat the same process
- Eventually buy a whole new tank or ASA
✅ What Expert Players Do
- Turn On/Off ASA to OFF (if equipped)
- Dry-fire 3–5 times, confirm silence
- Unscrew slowly — hear brief 1-second hiss at most
- Cap the tank immediately after removal
- O-ring lasts 6–12+ months between replacements
- ASA threads pristine after years of use
7. What to Do Immediately After Removing the Tank
The 60 seconds after tank removal are when the most preventable equipment damage happens. Here’s the complete post-removal protocol:
- Install the tank dust cap within 30 seconds. The tank neck O-ring is exposed and sits in a shallow groove with minimal retention force. Grit, sand, direct sunlight, and even handling can degrade it rapidly when uncapped.
- Visually inspect the O-ring while capping. Look for flat-spotting, surface cracking, or extrusion from the groove. This 5-second check costs nothing and tells you if a replacement is needed before your next session — not mid-game.
- Store the tank upright or on its side — never inverted. For CO2 tanks, storing inverted pools liquid CO2 at the valve, increasing valve seat wear. For HPA tanks, upright storage prevents regulator spring fatigue from gravity-assisted compression.
- For sessions longer than 2 hours or between-session storage: store at 500–1,000 PSI. Fully discharging or fully charging a stored tank both accelerate O-ring degradation through either moisture ingress (empty) or sustained compression stress (full).
- Wipe the tank body and regulator exterior with a dry cloth. Paint, field dirt, and moisture on the exterior are benign aesthetically but can migrate into the fill nipple during the next fill cycle. A clean tank exterior is a simple preventive measure.
8. Field Owner Section: Safe Tank Rotation for Rental Fleets
For paintball field owners managing rental fleets of 20–100+ markers, improper tank removal by staff during rapid game turnarounds is one of the highest-frequency causes of equipment degradation. A single 8-hour busy weekend day can involve 200+ tank swap cycles across a rental fleet — and each incorrect removal compounds O-ring wear that eventually triggers a cascade of mid-game leaks, player complaints, and refund requests.
Fleet Management Protocol: Tank Rotation at Scale
- Standardize on On/Off ASA markers for your entire rental fleet. The incremental marker cost is offset within one season by reduced O-ring replacement frequency alone. Fields that have made this transition report 30–40% reductions in per-marker weekly maintenance time.
- Create a laminated “Tank Swap Protocol” card for every staging station. Simple visual steps: OFF → Dry-fire × 5 → Unscrew → Cap. Staff turnover is high at most fields; written visual instructions at the point of action outperform verbal training alone by a significant margin.
- Designate one staff member per shift as the equipment check role. Between game rotations, this person does a 30-second O-ring visual inspection on every marker before the next group enters. Issues caught here prevent in-field equipment failures, which are far more disruptive and costly.
- Batch O-ring replacements every 6 weeks during peak season. Rather than replacing O-rings reactively when leaks are reported, schedule proactive fleet-wide O-ring replacement. At $3–$5 per marker for an O-ring kit, a 30-marker fleet costs $90–$150 per batch replacement — far less than the revenue cost of 5 games stopped by leaking rental equipment.
📊 Fleet O-Ring Cost vs. Downtime Revenue Loss — A Comparison
| Scenario | Cost | Time Impact | Player Experience |
|---|---|---|---|
| Proactive fleet O-ring replacement (30 markers, every 6 weeks) | $90–$150 in parts + 2 hrs labor | Zero downtime (done between sessions) | No impact — invisible maintenance |
| Reactive O-ring replacement after in-field failure | $5 in parts + 15 min per incident | Game paused; group waiting; staff pulled | Frustrated players; refund requests; negative reviews |
| 5 reactive failures in a single busy Saturday | $25 in parts + 75 min staff time | 5 game interruptions averaging 15 min each | $300–$500 in potential revenue at risk from refunds/reviews |
| Annual proactive maintenance cost (30-marker fleet) | ~$900–$1,200 in parts | ~24 hrs labor total per year | Near-zero equipment-related game interruptions |
9. Frequently Asked Questions
Can you remove a paintball tank while it still has pressure?
Yes — but only after depressurizing the marker body first using the dry-fire method or an On/Off ASA. The tank itself can remain at full pressure during removal; what matters is clearing the pressure in the ASA bore and marker body (Zone C and Zone D) before the thread gap opens. A tank at 3,000 PSI can be safely removed once the body pressure between the tank valve and the barrel is cleared to near-atmospheric.
Why does my paintball tank hiss when I unscrew it?
A brief hiss (1–2 seconds) is normal and represents the small volume of air in the narrow ASA passage between the tank valve seat and the first thread gap bleeding to atmosphere as the threads separate. This is a trivially small volume at low force. A sustained hiss (5+ seconds) means the marker body was not fully depressurized — stop, re-tighten, dry-fire more shots, and try again.
What happens if you forcefully remove a paintball tank under pressure?
Forcing a tank off a fully pressurized marker can: (1) eject the tank neck O-ring at high velocity from the groove, (2) cross-thread or strip the ASA port, (3) cause a rapid pressure release that can propel the tank backward, and (4) for CO2 tanks in high heat, create a liquid CO2 freeze-burst at the connection. The mathematical force on the O-ring at 800 PSI regulated pressure exceeds 21 pounds instantaneously — more than enough to permanently deform or eject a standard paintball tank O-ring.
How do I remove a paintball tank if my On/Off ASA is stuck?
If the On/Off lever or knob won’t move, don’t force it — you risk cracking the ASA body. Instead, point the marker safely and dry-fire repeatedly until no more air discharges. Even without closing the On/Off valve, this clears the marker body pressure. Then unscrew the tank slowly — the residual bleed from the tank’s own valve area is minor and manageable with a slow, controlled unthread.
How do you depressurize a paintball marker that won’t fire?
Try these in order: (1) switch your On/Off ASA to OFF if equipped; (2) locate and open the velocity adjuster or inline regulator bleed screw on your specific marker model; (3) if neither works, use the controlled slow-release method — unscrew the tank one-eighth turn at a time with 3–5 second pauses, allowing air to bleed gradually through the thread gap. If none of these clear the pressure, take the marker to a paintball technician without removing the barrel or disassembling the marker body.
Does the tank lose pressure when I remove it from the marker?
No — the tank itself retains its stored pressure after removal. The tank valve is a spring-loaded check valve that closes the moment the ASA connection is broken. Your gauge reading on a properly functioning HPA tank will show the same pressure before and after removal. If the tank reads lower pressure after removal than before, your tank valve or fill nipple check valve may be leaking and should be inspected.
Is it safe to leave my paintball tank screwed into the marker between sessions?
For short periods (same-day storage between games), yes — with the On/Off ASA in the OFF position if equipped. For multi-day or long-term storage, remove the tank. Leaving a tank installed under pressure for extended periods causes the tank neck O-ring to take a “compression set” — permanently flattening from sustained load — which accelerates its failure. Remove the tank, cap it, and store separately for any storage period longer than 24 hours.